Thursday, November 14, 2013

Alyssa Lea Designs FIRST release!!! - Sweet Stamp Shop Guest Designer

(If you're looking for the Unity hop - click HERE)

You remember the first stamp design team that I used to be on?
My Thoughts Exactly?
Yep - it's that amazing genius company that made those 'mix and match semtiment' stamps...
and the designer is back at it again,
creating some CAUUUTE stamps for the Sweet Stamp Shop!
Her name is Alyssa (Alyssa Lea Designs blog) and she actually is on the Unity Design team with me, too!

Anyway - I'm super excited to be asked to be one of her guest designers to feature her very first stamp set release as an illustrator/designer for the Sweet Stamp Shop!

You've got to check this out -
it's serious cuteness right here...
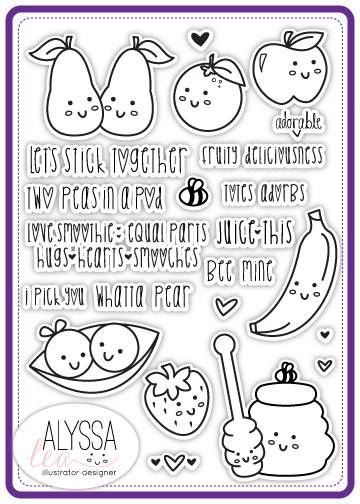
 photo YummyLove_zpsde00c90e.jpg

See what I mean?
She just NAILED it with the 'kawaii' style!
(I happed to see other ones coming out next month...
and oooh, you're gonna love them!)

Anyway - with that 'love smoothie' sentiment - 
I couldn't resist but to make a blender for it!
...and here's my project!

 photo DSC_2907_zps7bcfc0fa.jpg

I found this perfect blender file from the Silhouette store,
to create the perfect smoothie!

 photo DSC_2906_zps4ad68bb3.jpg

There are quite a few layers to make this card - 
using acetate as the pitcher glass,
all the yummy love fruits are cut out using the corresponding SVGs, stamped and colored,
backed with three equally divided smoothie colors in the background.

 photo DSC_2904_zpsb111c494.jpg

You want this stamp set, don't ya?
Well... ALL the NEW RELEASES (there's more on the Sweet Stamp Shop blog) are 20% off 
CODE: NRN20
so it may be the best time for you to get yourself something for Christmas! lol.

Oooh, a couple more things:
1. Check out the new FLAIRS!!! So super cute and totally matches with these stamps!
2. If you like this design - then you've got to get the Lemon Lime Digi from the store as well! Adorable! 

Hope that you liked my project today - 
thanks for coming by!
... and come on back tomorrow to see another project made with these awesome stamps!


Sunday, November 10, 2013

Counting down to Christmas... :)

Hello Sunday!
I just love this day of the week...
everything just seems so calm, and laid back.
Well... at least that's what I hope Sundays are to be. :)

Since us Canadians are done with Thanksgiving,
we are excited for upcoming Christmas.
That being said, I refuse to pull out all my decorations until December 1st,
but we talk about it a lot :)

I decided to surprise the kids with a fun little ADVENT CALENDAR this year.
It was super easy as I'm using to breaking things apart, welding, and altering and such...
this - it was just cut it out, and decorate it some fun stickers!

 photo DSC_2835_zps0b11be0e.jpg

I used the Echo Park's Holly Jolly Christmas and was perfect cuteness for this.
I matched the colors of the patterns from this collection to choose the colors of the trees.

 photo DSC_2839_zps073bc790.jpg

Each of the compartments are big enough to fit in several candies or even little toys.
You don't need to rip the doors open, which means that you can use this over and over again, too

 photo DSC_2838_zpscf635718.jpg

Using a collection makes it super easy - 
especially ones that already comes with fun stickers!

 photo DSC_2837_zpse04b0006.jpg

The compartments in the last few days get a little bit bigger..
which means there's more space to make it extra special!

 photo DSC_2836_zpsd837f74b.jpg

...and of course, the last day is the biggest! 
Wonder what's inside?
(Nothing yet! lol.)

So, if you're planning on making one this year - 
it's a good time to get this started!
You can get the FILE here.

There's ANOTHER version of an ADVENT CALENDAR, too - 
which is also super fun to make!
You can even make both! :)


Oooh, and have you seen the latest peek for the newest KIT?
I have a feeling this is going to be amazing!
My son has passion for TRAINS, so yeah, 
I'm sure you'll be seeing my version sometime here soon! :)


Wednesday, November 6, 2013

Cozy Fireplace Bag - WITH TUTORIALS :) SVG Cuts DT Project.

Hello All!!!

Some of you may have already seen this project as it is from last year.
However, this post is a bit different -
for those of you that want to make this -
I've made it super duper easy by adding a step by step tutorial of making the stones :)

I thought that it would be so cool to create a Fireplace gift bag using SVG Cuts files!
There's one from the store (and it is a bag!), 
but I thought that it would be so cool to actually have a 3D effect to it 
by making the burner part indent a bit into the bag!
 It's one of those ideas that was lingering around in my head for the longest time, 
and finally decided to make it!

So, wanna see?
I was really excited to share this one! 
(like any of my other projects! HA!)

 photo DSC_0038_zps1ef29fd9.jpg

So so cool, right? 
Those 'stones' are actually separate pieces! 
I cut them out and inked them all! 
Craziness, you may say, but it wasn't so bad! 
I'll share a technique that I did below! 
and yep - those stones are actually from SVG Cuts files... 
you may wonder where??? 
 HOWEVER - you will need to do something 'special' with it, for you to cut like that! 
(refer to the instructions below!) 
Okay, hope that you're not giving up here... it's really not that bad! 
OR, you can simply use a brick or stone patterned paper, 
and OMIT this whole 'stone-work' step!

 photo DSC_0043_zpsef4d6cc7.jpg

I just LOVE this sentiment stamp - 
of course, this stamp coming from my favorite stamps company - Unity!

 photo DSC_0044_zps3ce82c95.jpg


With these stockings, I cut two of them out and stitched it together. 
It was just the right size to stick in mini candy canes :)

The main part of my project was made using just the AC plain colored cardstock,
but used Echo Park This and That Christmas to accent my project.

 photo DSC_0045_zps55b34752.jpg


...and here's the fireplace!

I inked a bit on the inside with grey to add to the 'worn' look of the fireplace. 
The logs are actual twigs all held together by hot glue. 
It just adds to the 'coziness' by using some natural elements.

Here are the collections needed to make this:

3D Letters SVG Kit

The above two is what you'll need to make the 'base' of the bag.

Moonlight Garden Party SVG Kit (the stones and the 'fence' SVG)
Merry and Bright SVG Kit (stocking SVG)

FOR FULL INSTRUCTIONS - REFER TO THE SVG CUTS BLOG.

TUTORIAL: HOW TO MAKE STONE TILES

ON SIZZIX ECLIPS

1. Open up column_top and bottom.svg and resize.


2. Break apart, and delete the top of the column. Regroup.


3. Overlap the column_top.svg on top of colum_bottom.svg - should look like this.


4. Select all, right click and choose 'Path' and then 'Front Minus Back' option.


5. When you hit preview - you will notice that there is a vertical line down on one of the sides.
That IS okay :)


Cut and past multiples on a page.

ON SILOUETTE CAMEO

1. Open column_top.svg and column_bottom.svg and resize.


2. By right clicking, or choosing 'Object'  - choose 'make compound path'


3. By right clicking on the column_top.svg, 'release compound path'
and delete the unnecessary shapes. Regroup.


4. Place column_top.svg and top of column_bottom.svg


 photo stone2_zpsed182fa3.jpg


5. Choose 'modify' category and 'subract'

This is a bit different from eclips as the middle stone disappears.


In order to get the middle stone, do the same as above, but at step 5, instead of choosing 'subract', choose 'intersect'

 photo stone1_zpsf802c7a5.jpg


6.For the inking the stones, I found it useful to 'ink' them before taking them off the mat.


Photobucket


(While the paper is covering the 'rest' of the mat,
 I inked it with brown, black, grey and distressed ink to get the look I wanted :)


Photobucket


I really enjoyed making it, and any gift given in this bag would be extra special!

Alright, that's it for today!

Make sure that you pick up the latest free kit of the week, too -
it's beautiful!
(must spend $9.98 or more, coupon: FREEGIFT)


Thursday, October 31, 2013

LOADS of FUN with Unity Thursday!

Happy Halloween!!!
It's another fun day over at Unity and SO GLAD that you took your time to hop! :)
I know you're all busy with Halloween festivites, but you don't wanna miss anything here, don't you?

You should be arriving here from Shemaine's blog,
and here's the full participating list for your reference.

Thienly Azim - me!


I've got several projects to share with you today, but sorry to disppoint you...
nothing is Halloween related! lol.
Moving on... my head is all jingling with all holiday related stuff!

There are TONS of NEW RELEASES today, so make sure that you check them all out!

First of all...
let's welcome our latest ANGIEgirl into the family -
CHARLEE!!!
She's super cute, isn't she?
I just LOVE her leggings!
I want one like that!

 photo DSC_2845_zps46da2440.jpg

I used the Jillibean Soup Winter Tortellini and Spinich Soup collection 
and was inspired to follow the color scheme for the card.

 photo DSC_2847_zpsc599812c.jpg

I added button and doilies to the side - which adds interest :)

The next one is also designed by Angie Blom (isn't she amazing?) - 
and it's the cutest lovable deer!
I know some of you have mentioned to not include the frame, 
and you can totally do that! 
I put it inside a wooden scalloped square frame and gives it a bit different look!
(I used the same Jillibean collection as above)

 photo DSC_2857_zpsb353530b.jpg

I personally think that this is my fave project out of my four today.
I just love the classic-ness of the deer!
I put the deer over a vellum and created a little TABLE LANTERN
(changed the window to square)
(can you see the faint glow inside?)

The next project is using the current Kit of the Month.
I tried to combine as many stamps in the set to make a project and this is what I did!
It's a mail BOX!


 photo DSC_2841_zps534a6f99.jpg

To make this, I used six stamps from the kit.
It's so fun to combine!

 I altered the GIFT BOX
and altered the dimensions for the rectangular box to create a little gift box.
and simply added a MAIL cut out.

 photo DSC_2842_1_zps770ad638.jpg

As soon as I decided to this, 
I was set on using the Echo Park This and That Christmas collection.
Has a bit of a vintag-y festive look :)

Lastly, but not least - 
here's a TEABAG DISPENSER BOX that I made using the current Stamp of the Week!

 photo holidayjoy2_zpsd3f9f392.jpg

It's such a pretty image - 
it would make great gift tags by itself!

 photo DSC_2777_zps1bd0141a.jpg

Okay, I hope that you liked my projects today!

Make sure to go check out all other blogs for inspiration using the new release,
and don't forget to go to the STORE to see all that's on SALE!


 photo unity3_zpsda12dae8.jpg


 photo unity4_zpsce09e6c9.jpg

That's it! 

Now, don't forget to comment!
This week, 2 lucky winners are going to be chosen randomly to receive this bundle!

 photo unity5_zps4d6cc91c.jpg


I'm sending you off to Stephanie's blog!


Oh, and for my SVG Cuts friends...
Have you seen the latest kit yet (coming out today and here's a peek)
Isn't it beautiful? Will be available here later today!

 photo unity6_zpsb6b264c2.jpg

Thursday, October 24, 2013

It's a Darn Good Thursday over at Unity!

Hello All!!!
I'm excited 'cause my post is gonna be a bit different from usual :)

I have a special post for you today -
with the help of my little helpers :)

You should be arriving here from Shilo's blog -
and here's a list for your reference!
 I'm training my kids to be future Unity stamp users! lol.
When they received their 'OWN' Little Hands stamps from Unity -
look how EXCITED and HAPPY they are!

 photo DSC_2794_zps8e1c19ae.jpg

I brought out some cardstock, ink, washi tape, wiggly eyes,
and other fun embellishments and you've got to see what they've created!

 photo DSC_2798_zps2fb8762b.jpg

Kai, 6, knows to put the cling onto the acrylic block to stamp! 
He's busy making something!


 photo DSC_2808_zps111aded7.jpg

...and look how proud they are!
 photo kai_zps6eba3697.jpg

 photo Amelie_zps49efed2c.jpg

The sizes of these stamps are a bit larger than usual - 
which makes it kid friendly and easy to color!

These would be fun images for your next kids' Christmas party, too - 
as one of the activities!

They are ON SALE - so make sure you go check it out!

Next up  -
don't forget about the {be inspired} challenge going on!

 photo challenge_zps38fa7ad2.jpg

As long as you use Unity stamps - 
it doesn't have to be Christmas themed.
Do what your heart desires - 
using either the color combo, sketch or both!

Here's another take on the card sketch!

 photo DSC_2818_zpsd8e64ad1.jpg

Isn't this snowman in a snowglobe adorable?
It's from last year's set - Snowglobe Wonderland.
ALSO on SALE!
The side bigger snowflakes are from Snowflake Kisses!

 photo DSC_2819_zps86240a0a.jpg

I used wooden heart and snowflakes to add some dimension to the card.

... and one last project!
This is just a random card I wanted to share!
Using one of my FAVORITE MUSTACHE!

 photo DSC_1519_zps652320df.jpg

I added the mustache onto a stick,
along with GLASSES cut out to make some mini photo props :)

 photo DSC_1520_zps9507e692.jpg

That's it!
I hope that you enjoyed my little special helper as my 'guests' today!

Don't forget to check out their DARN GOOD DEALS sale!

 photo darn1_zpsba3ab181.jpg

and discounted shipping, too!

 photo darn2_zps71eedc96.jpg

Thanks for coming by!
Have a great shopping Thursday girls!

Click here to shop.
Click here to go back to the Unity blog.

OOOH, and don't forget to leave a comment!
3 lucky winners will be chosen to receive
 2 sentiment kits of their choice!

LinkWithin

Related Posts with Thumbnails