Us Epiphany Crafts Design Team is up with The Twinery team this week! Each day of the week, we'll be having a blog hop with them to show you all how amazing these two companies' products can be together!

Today is my day to share my Twinery/Epiphany Crafts projects and you should be coming from talented Stacy Rodriguez' blog. If you happened to visit my blog today (just because you love me so much!) - I'm flattered, but please start from Epiphany Crafts' blog! lol...
Designers participating in the hop today:
Epiphany Crafts blog
Twinery blog
Creative Paper Trail - Andrea Budjack
Rodriguez Designs - Stacy Rodriguez
mod paperie <----- YOU ARE HERE
iEmbellish - Jessica Fick
Rocko & Bella - Sarah Hill
I had all sorts of ideas on what to make with twine... and most of them involved cards, bags, etc... but thought that it would be fun to do something different! So I decided to use twine to make a sling! Then I covered round metal pots to make cute containers. These are perfect to put in cutlery for a picnic party, or you could just display them in your crafty space to hold all your pretty pens :)
So.... here's the project!
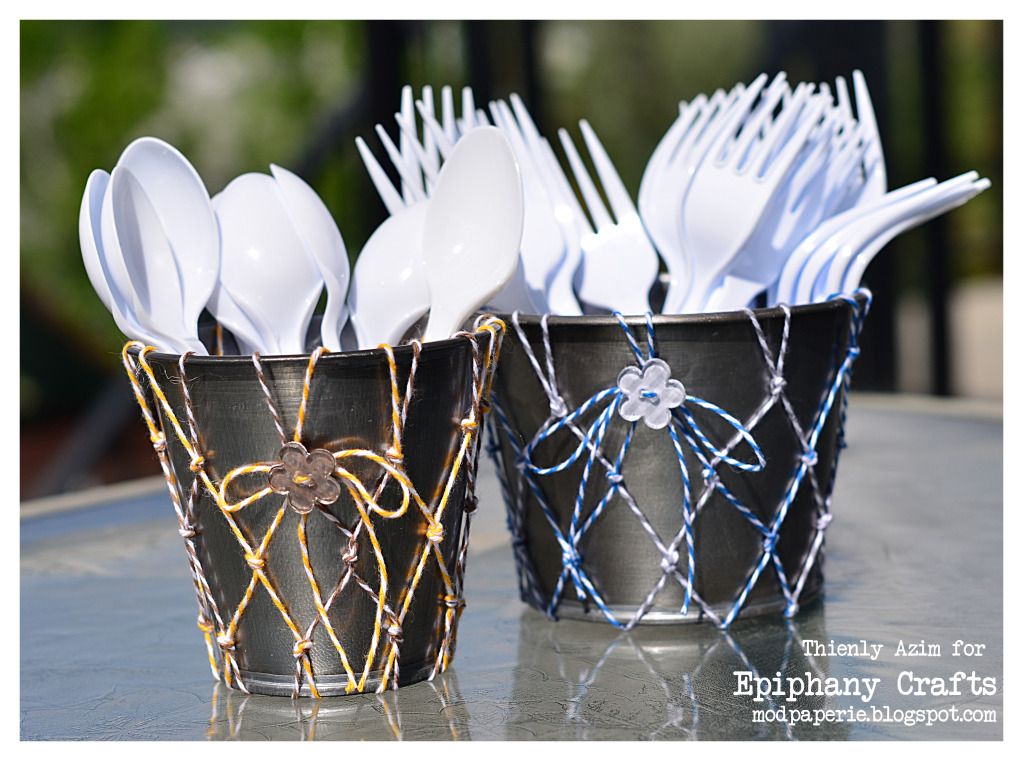
It's really bright and cheerful, and SUPER EASY project! Here's the view from the side upclose:
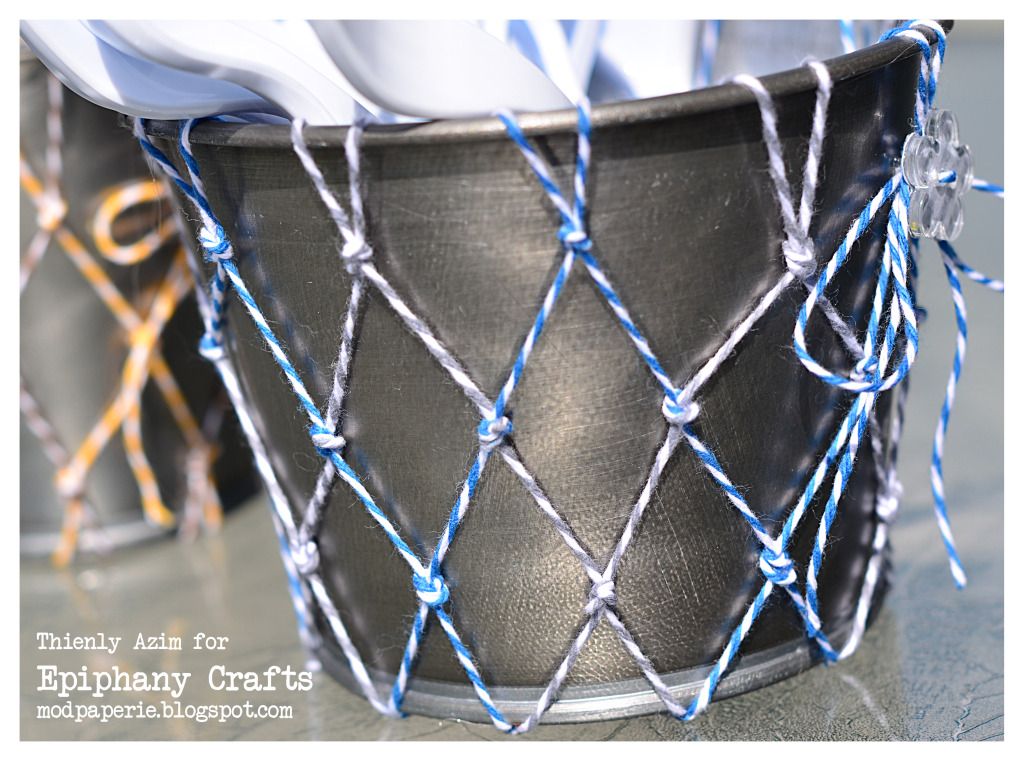
So fun, isn't it? Doesn't it make you want to make these???
To make them, here are the things you'll need:
Epiphany Crafts Shape Studio Tool Flower 20 and Button
The Twiner twine: Denim, Lemondrop, Cappuccino, Stone
Metal Round Pot/Container
Metal Ring/Washer (got them from a hardware store)
Hot Glue Gun (to adhere the metal ring to the bottom and also for attaching twine inside the container)
Paper (to make buttons - I used Echo Park Dots and Stipes)
To make these.... I thought that it would be the best if I made a fun tutorial for you!
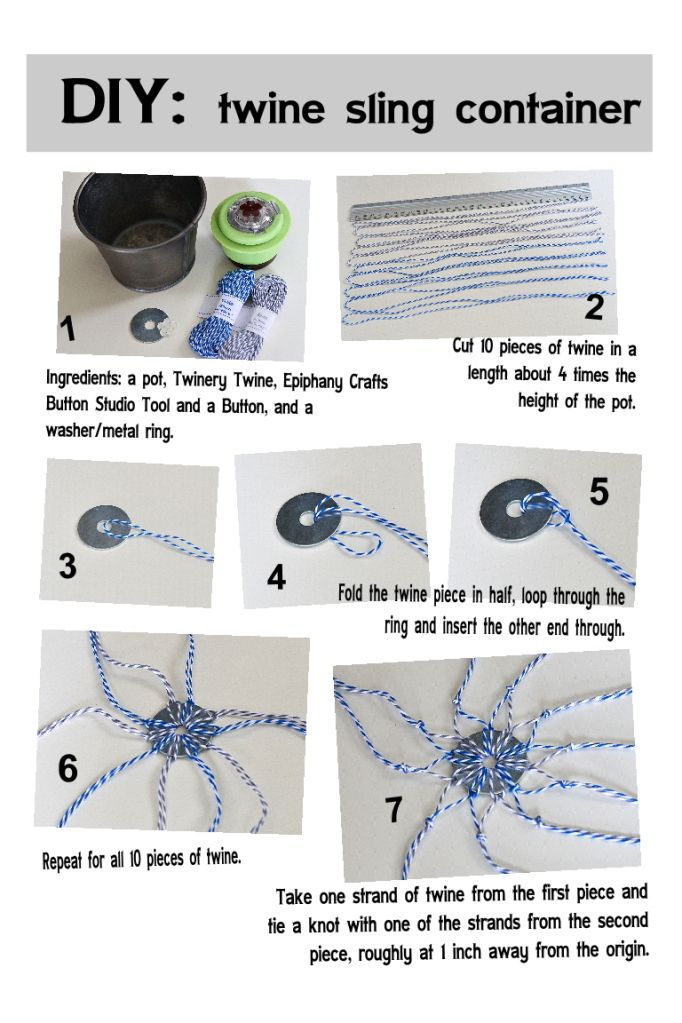
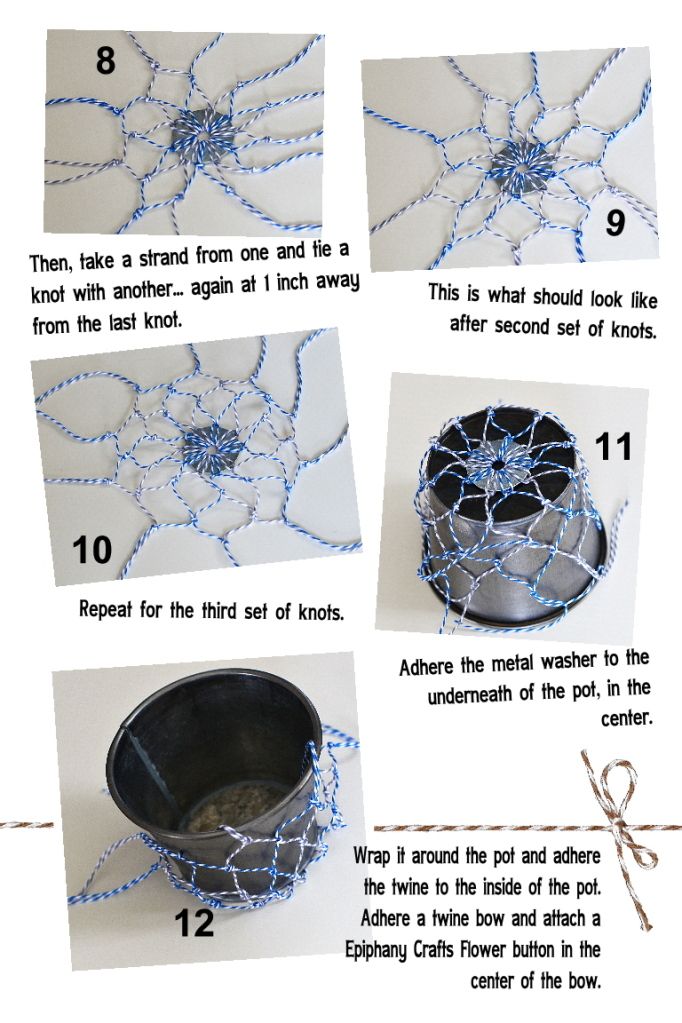
Now... for the fun part!
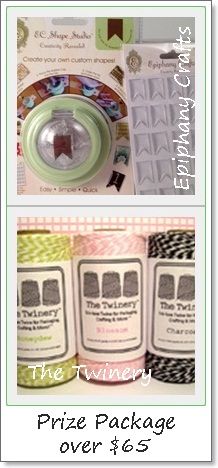
There's a GIVEAWAY! YEAH! You'll be required to visit all of the participating blogs and comment for the next five days... and ONE lucky (REALLY LUCKY!) winner will receive 3 spools of twine (Honeydew, Blossom and Charcoal) and an Epiphany Crafts Shape Studio Pennant Tool with the matching bubble caps! Who wouldn't want that?
You MUST leave all your comments by 11:59PM EDT, Sunday, June 3rd. Winner will be announced the following day on the Twinery and Epiphany Crafts blog.
That's it! Thanks for stopping by! ... and now, you're off to Jessica Fick's blog!
Oooh, and don't forget that SVG Cuts is having a sale - EVERYTHING in the store is 25% off with the code: MEMORIAL2012.

Wow, what a fun and creative project!
ReplyDeleteI would never think of that, THANKS :)
ReplyDeleteWOW!!!!! I'm totally loving this, getting ready to grab my shoes and head out to the garage to see if I can find a washer :)
ReplyDeleteWOW is right! Such a fab project, thanks for the directions and for playing along with The Twinery!
ReplyDeleteThat is so dang cute!! LOVE it!!
ReplyDeleteGreat project and thanks for the tutorial!
ReplyDeleteThat is so cool! Thanks for the instructions!
ReplyDeleteSo inventive... perfect for a Memorial Day cookout
ReplyDeleteOh...such a sweet idea for those little buckets!
ReplyDeletethis is so cool...totally love this idea...thanks for sharing...i love it
ReplyDeleteWow! What a fabulous idea!
ReplyDeleteOOH WoW! This is such a great project...I can see that technique for those ocean net floaters, for a mermaid party:)
ReplyDeleteWhat a fabulous and creative idea. Thanks for the inspiration.
ReplyDeleteWowsers! That is just tooooo cool! TFS the instructions on how to do this. It's gorgeous!! :-)
ReplyDeletewoooaaaaa !! Great project and thanks for the tutorial! Thanks for the chane to win!!
ReplyDeleteSuch a clever idea! Great wag to decorate and you could totally switch them out for different holidays/events!
ReplyDeleteWow what a Super Awesome Idea. love the way you used the Twine it looks cool. thanks for showing us how you made this. thanks for sharin g and for the chance to win.
ReplyDeleteabbraddock@msn.com
super idea and thanks for showing how you made it!
ReplyDeletevery cool and unique project!
ReplyDeleteWow! This is awesome! So creative!
ReplyDeleteSuper crafty! Thanks for the tutorial I just adore it! AND Thanks for the chance to win some really great stuff!!
ReplyDeleteVery creative.
ReplyDeleteWow! Just amazing how you have made these, where did the idea come from. There just amazing!
ReplyDeletesuper cute and so creative!! Thanks for the tutorial, I just might have to make one or two!!
ReplyDeleteSo fun! What a wonderfully creative and adaptable idea (it would be so easy to change the colors depending on the event.) Thanks so much for sharing how you did it! I'm still not sure if I could do it, but at least I could try!
ReplyDeleteOh, thanks so much for the tutorial! I was trying to envision how you attached it all to the bottom! Very cute idea
ReplyDeletesheri
sherii at cfl dot rr dot com
Ingenious! I'm gonna have to give this one a try!
ReplyDeleteWhat a great way to dress up those metal pots!
ReplyDeleteYour idea reminds me of the way fishermen weave their fish nets.
Very creative of you. =)
Been eyeing some rolls of Twine in candy-licious pastels and EC Shape Studio Pennant and Heart for a while. Hopefully, I'll win this blog hop.
Thank you for the detailed tutorial with pictures! =D
This is soooo cool looking! So wish I had the patience to do that :)
ReplyDeletepruttybird at comcast dot net
Really cute......reminds me of my old macrame days!! :)
ReplyDeleteSuper cool. Thanks for the instructions. I just might try this one.
ReplyDeleteFun hop! Thanks for all the inspiration!
ReplyDeleteCarol B
ciaoitalia2007(at)gmail(dot)com
Oh my gosh Thienly i love this project but honestly I would never be able to sit still that long girl! You rock for completing it two times omg! They are adorable!
ReplyDeleteAwesome project!
ReplyDeleteSuper cute. Thanks for the tutorial!
ReplyDeletenice project. thank you for sharing. rush88888@gmail.com
ReplyDeleteTHANKS for sharing your project is AMAZING!! THANKS for the chance to win and have a FABULOUS WEEK!! =)
ReplyDeleteLovely project! By using twine in different colors, you can make the flower pots match any interior. TFS!
ReplyDeleteSuch beautiful projects, thanks also for the photo tutorial, looks like a lot of love and hard work went with making the flower pots look so pretty!!!
ReplyDeleteSuch a CLEVER use of the twine...excellent idea!
ReplyDeleteCute!! Great use for the twine! :D
ReplyDeleteGenius! Live it... *smile*
ReplyDeletewhat a super cool idea :) TFS :) ♥
ReplyDeletevery cute and appreciate your tutorial! Linda Vigil
ReplyDeleteWow! What a neat idea! Thanks for sharing it.
ReplyDeleteSuper cute idea and just in time for summer. thanks for sharing it.
ReplyDeleteThat's so cool! Thanks for sharing and a chance to win.
ReplyDeleteLove this idea. Definately something I am going to do.
ReplyDeleteHow cute! These remind me of the jute plant hangers we made in the late 60's...yes, that's a loooong time ago! So adorable for the picnic table!
ReplyDeleteGreat tutorial for a super cute project!
ReplyDeleteI love your project. Really cute.
ReplyDeleteVery clear tutorial! Thanks.
ReplyDeleteLove, Love your crafty project!!! This is one I am definitely trying!! TFS the tutorial - looks easy peasy!!!
ReplyDeleteNice project - I never would have thought to use macrame' techniques with baker's twine!
ReplyDeleteWow that quite the spiders web! Very cleaver use of the twine.
ReplyDeleteI love your project and what a great tutorial!!!
ReplyDeletekissmyjen at gmail.com
justcreativeme.blogspot.com
This is such a fun idea! Thanks for the awesome tutorial!
ReplyDeleteI love how different this is! Very nice work, I would So like to try this.
ReplyDeleteWOW those tins were my favorite project. You are so talented.!!
ReplyDeleteYou could use so many different combinations of colored twines to create these for every Holiday of the year! Very cute! ~ Jo
ReplyDeletejomoseley57 at gmail dot com
such a cute project---thanks for sharing!
ReplyDeleteWOW, I am so totally impressed. I have to try this.
ReplyDeleteI'm bad about just reading your emails and not coming to comment, I love these and think they are SO cute!!
ReplyDeleteWow...very impressive and very unique. Great job!
ReplyDeletepapercrafting4you@gmail.com
amazing idea! tfs
ReplyDeleteWay cute and thanks for the instructions!
ReplyDeleteCarla from Utah
TY for the cool instructions and I love how you've adorned the tins with twine. Fab idea!
ReplyDeleteThanks you for the great instructions. I really love this project and would like to give it a try. TFS
ReplyDeleteWhat a great idea!! Thank you for the detailed instructions!!
ReplyDeleteGreat ideas! Thans! Meredith mlefforge@aol.com
ReplyDeleteWow - what a great idea and project! I LOVE your buckets and thanks so much for the tutorial!!
ReplyDeleteAWESOME!! Love this idea and thank you for the tutorial!! TFS!
ReplyDeleteWow this would be great for the 4th of July. Great Job TFS AJ~
ReplyDeleteSo cute..what a great use of twine!
ReplyDeleteThat's such a cute and creative way to dress up containers for an outdoor party. It's perfect for the summer!
ReplyDeleteWhat an amazing idea!! The tutorial is AMAZING!! Thanks so Much for the tutorial!! TFS!! Take Care!!
ReplyDeleteJennie @ http://earthyscrap.blogspot.com/